 One of the most difficult things to understand and apply when shooting film is screen direction. There are two parts to it, walking direction or direction of movement, and viewing direction, as in a dialog between two people.
When an actor or a car (or anything really) is moving across the screen from left to right, the assumption is that in the next shot the object will still be moving left to right in order to move forward. If it is moving from right to left, the audience will assume it is “coming back”, returning from wherever it’s been.
When two actors are in conversation, the actor positioned on the left in the wide shot needs to always be looking left to right in any close up, and vice versa in order for it to look as if they are looking at their counterpart. If the direction is switched, the audience will lose track of who is talking to whom. This becomes even more confusing if there are more than two people in the conversation.
There are different ways, when an actor is travelling across the screen, to cross the line and show them going the other way without confusing the audience:
Use a cutaway between the two shots,
use geography to establish general surroundings so that the audience can place the actor in context,
use stairs or a lift to allow the actor to change direction,
let the actor cross in front of the camera, or the camera cross the line of movement of the actor.
This little movie explains the different options:
One of the most difficult things to understand and apply when shooting film is screen direction. There are two parts to it, walking direction or direction of movement, and viewing direction, as in a dialog between two people.
When an actor or a car (or anything really) is moving across the screen from left to right, the assumption is that in the next shot the object will still be moving left to right in order to move forward. If it is moving from right to left, the audience will assume it is “coming back”, returning from wherever it’s been.
When two actors are in conversation, the actor positioned on the left in the wide shot needs to always be looking left to right in any close up, and vice versa in order for it to look as if they are looking at their counterpart. If the direction is switched, the audience will lose track of who is talking to whom. This becomes even more confusing if there are more than two people in the conversation.
There are different ways, when an actor is travelling across the screen, to cross the line and show them going the other way without confusing the audience:
Use a cutaway between the two shots,
use geography to establish general surroundings so that the audience can place the actor in context,
use stairs or a lift to allow the actor to change direction,
let the actor cross in front of the camera, or the camera cross the line of movement of the actor.
This little movie explains the different options:

27 February 2007
Screen direction
One of the most difficult things to understand and apply when shooting film is screen direction. There are two parts to it, walking direction or direction of movement, and viewing direction, as in a dialog between two people.
When an actor or a car (or anything really) is moving across the screen from left to right, the assumption is that in the next shot the object will still be moving left to right in order to move forward. If it is moving from right to left, the audience will assume it is “coming back”, returning from wherever it’s been.
When two actors are in conversation, the actor positioned on the left in the wide shot needs to always be looking left to right in any close up, and vice versa in order for it to look as if they are looking at their counterpart. If the direction is switched, the audience will lose track of who is talking to whom. This becomes even more confusing if there are more than two people in the conversation.
There are different ways, when an actor is travelling across the screen, to cross the line and show them going the other way without confusing the audience:
Use a cutaway between the two shots,
use geography to establish general surroundings so that the audience can place the actor in context,
use stairs or a lift to allow the actor to change direction,
let the actor cross in front of the camera, or the camera cross the line of movement of the actor.
This little movie explains the different options:
26 February 2007
Film Wellington

As part of the Wellington council’s effort to promote itself as a filming location we had a visit from Film Wellington’s Delia Shanly, who introduced us into the intricacies of film permits. Film Wellington works with the council as an intermediary for film makers to arrange permits for all filming activities including road closures and parking. Any commercial shoot needs permits, and the service is free. As film makers we have to do the organising ourselves, such as hiring a traffic management crew, safety team and possible letter drops and other communication with private shops and residents. The council controls parks and gardens, cemeteries, beaches and nature reserves, so lots of interesting locations.
A permit requires the film production to have public liability insurance, which can cost $200-300 for a 2-3 day shoot, although a production company could get annual insurance if a number aof shoots are planned. Film Wellington can provide information regarding availability of locations and events that may interfere with shooting and the permit also acts as a property release. It is possible to block a range of days to allow for bad weather or to give more shooting options. Parking can be booked via Film Wellington for parking of essential vehicles as well as to keep areas free in front of locations. A road closure requires a three week deadline, as Wellington council publicises all road closures in the paper. The production pays the adverts ($500) and a road closure fee of $300. There can be no work on a road without proper traffic management, so it might be a good idea to come up with alternate shooting plans, like working from the road side within normal traffic rules or in a private road.
23 February 2007
Financing

Robin Laing is a producer as well as the chair of the Film School board. She talked to us about the process of financing a film and the possibilities for funding in New Zealand and Australia. There are two different ways of funding a project, commissioning and working on spec. Most commissioned projects are for TV, educational or advertising. Other types of projects are created by the film maker on spec, i.e. they have an idea and try to get it funded or find investors. In NZ most funding is government money in one way or another; other options are taking out a loan, pre-sell to a distributor, get a distribution or screening guarantee, or to lower the budget by getting services in kind and the crew to defer their fees.
Robin pointed out the importance of knowing your target audience before starting any film, and to research distributors and potential buyers to see if there is a market. New Zealand has co-production treaties with France, the UK, Ireland, South Africa and Italy, amongst others, so there is the possibility to get funding for a local project by going abroad. Robin also talked about the possibilities of starting out by making a short film. While there is little market for those in New Zealand, there is a market offshore and at festivals, so they are a way of getting known. The Film Commission has three producer teams who help make short films. Unfortunately she also mentioned that there is no documentary financing in New Zealand, so this would probably mean going at least to Australia to get funding.
21 February 2007
 Another practical project today, mixed in with an intro to editing. The brief was short and wide open: Capture a
 19 February 2007
Crew structure and roles

Today we talked about the many different people who could be involved with a production and at which point the might join the project. If you’ve ever wondered about the many people listed in the credits of a movie, read on:
Pre-Production
★ Writer - (who is also sometimes the director);
★ Producer - finds script/idea, commissions writer, puts together package to raise money,holds and assigns rights and is the principal organiser. There are also executive producers (brings money or might have a relationship with the distributor or other source of funding), co-producers (could be a producer in another country) and associate producers (who might hold some rights);
Working for the producer are:
★ Line producer - executes management, organises schedule, budget and script, assisted by one or more:
★ Production managers - organises crew contracts;
★ Location manager/scout - supervises schedules, hires gear and locations and organises facilities such as cars, hotels, studios;
★ Production co-ordinator - makes sure personnel get to and from the shoot, that the schedule is feasible and organises the gear for the actual shoot; all of them are assisted by
★ Production assistants and secretaries as well as runners.
Attached to the production office are also publicists and casting managers, who will spring into action later on, as well as unit and caterers during the shoot. These people stay on throughout the film making process as needed, while many more crew is added for the shoot:
Production
★ Director - the director comes on board during pre-production, but their main role comes during the shoot, where they are responsible for the vision of the film. They work with the producer (mostly ;-) and are supported by
★ 1st assistant director - controls scheduling on a day to day basis, is the connection between the set and the production office, monitors information from the department heads, is basically an organiser, manager and liaison;
★ 2nd assistant director - also liaises between production office and set, concentrating on actors and the next day’s call sheet;
★ Script supervisor - keeping track of rehearsals and any script changes as well as continuity.
Working with the director are also
★ Director of Photography (DoP) - evolves the visual style together with the art director and the director; on set assisted by
★ Camera operator - handles the camera, provides a sense of continuity, knows what the frame should be, deals with actors, lighting and the art department;
★ Camera assistant - can also be the focus puller and is responsible for camera and accessories;
★ Clapper loader - responsible for loading the camera, maintaining stock and getting it to the processing house as well as keeping detailed shooting records;
★ Video assist - provides a monitor feed from the camera to a monitor for continuity. In the lighting department supporting the DoP is the
★ Gaffer - in charge of the lighting crew,
★ Best Boy - assistant to the gaffer,
★ Lighting assists - run cables, put up lights, set up power supplies and may do some FX lighting,
★ Grip - is responsible for all camera movement, mounting the camera on cranes, dollies, etc, as well as building rostrums and other fixings for the camera.
The sound department on set is headed by the
★ Sound recordist or location recorder - checks the picture from the video screen, may record two or three tracks simultaneously, makes atmosphere recordings and captures background sound as needed,
★ Boom swinger/operator - captures the best possible sound without the mic getting into the frame, ★ grams operator - provides any practical music on set,
★ playback - used in music videos. In post production there is also the
★ Sound designer - responsible for the post production process, dubbing editor, musical composer, track layers, foley and sound mixers.
The art department is headed by the
★ Production designer - responsible for the look (with the DoP and the director), makes budget decision for set and location, decides on the style and colour palette and costumes.
★ Art director - executes this vision
★ Art department managers - budget, co-ordinate and provide personnel,
★ Builders, such as chippies and plasterers, build the sets,
★ Set finishers and decorators - paint and age the set as necessary,
★ set dressers - provide props and ‘reality’ to the set, assisted by the prop buyers and handlers (also stand-by props) during the shoot.
★ Costume designer - supervises pattern makers, cutters, machinists and dyers during pre-production and stand-by wardrobe, dressers, and make-up during the shoot.
★ Animal and vehicle wranglers do just that.
Post-production As well as sound people post-production adds these people to the crew:
★ Editor - either operates the editing gear or works with an editor
★ Digitiser - converts footage into data for the non-linear editor
★ Compositors - if there are any animated or FX sequences
★ Negative cutter - creates the master print
18 February 2007
Continuity

Clare Cunningham returned today to talk us through the duties of the continuity person. Although every department does their own continuity, the costume department being responsible for making sure the actors wear the same clothe as in the previous scene of as in the previous scene and in the same way, for example, the continuity person is the believability police, the editor’s eye on set; making sure that scenes filmed far apart from each other will still cut together in the editing room.
Pre-Production
Clare gave us an idea of what is required to prepare a script for continuity and note taking on set involving the following steps:
1. Read the script for general glaring continuity/believability mistakes. Sudden unexplained switches from day to night or location, weather or costume.
2. Time the script by visualising the action, reading it out loud and acting it out as necessary (in a closed room, unless you’re really good). Give a copy of the timing to the director and producer so that they will know if it’s too long. (use this Continuity Breakdown sheet)
3. Work out the temporal movements, e.g. what day is it, How much time has elapsed? What time of day is it? Ascribe a day of the week for each scene Do this for all scenes, even if it doesn’t seem important, it speeds up decision making on set and you may not have time to work it out then. Get it signed off by the director and pass a copy to each department.
4. Get hold of a one-page-per-scene script. Prepare the script by highlighting all references to weather/lighting, props, costume, character looks. Then plot backwards and forwards through the script to work out where props have to appear first, e.g. a TV in a room where the TV is used later on. Mark any direct continuity with scene and page numbers. Shooting day On the shooting day you will need:
★ a prepared copy of the script,
★ a notebook to make rough continuity shot list notes,
★ a clean copy of the script to mark up for the editor
★ a daily progress report if the production dept requires it,
★ continuity shot lists to write up for the editor, one per scene,
★ a stop watch with the beep removed,
★ pens and highlighters,
★ a small camp stool,
★ a ruler to stripe the script
★ a chinagraph pen to mark liquid levels in glasses
1. During blocking and rehearsal mark up the script: put a line through the script to show action covered and write a short shot description and slate number at the top of the page.
2. Write the slate number and a shot description in your rough continuity shot list notebook.
3. Time the rehearsal.
4. Before the take make sure continuity is right and prime yourself for the main points to consider.
5. During shooting time the take, write down comments and best take.
6. During setup for the next shot, mark up the editor’s copy and fill in the good continuity shot list. Finish those before the end of the day.
7. At the end of the shooting day, complete a script duration reconciliation form to make sure the film is on target for length.
A few of Clare’s tips on set: Do the wide shot first, then the close-ups. Apart from anything else, close-ups can be controlled better and therefore continuity problems (changing light, for example) can be dealt with on a much smaller scale.
Learn where cuts are likely to be, so that you can make sure that screen direction and actions match from take to take. Cuts are often made on movement or on hard syllables or loud sounds.
It’s helpful to check frequently what the shots look like on the monitor feed from the camera.
In crowd shots, squint to see if any particular colour or shape sticks out, or if anyone is particularly noticeable.
Make a location map to define the general directions of the actors, so that they always walk out the front door in the same direction when they are going to the pub, for example.
Change screen direction by using a head-on shot or crossing the camera in front of the line of action. You can also use an extra-wide shot to show the general geography.
When the actors are walking, you can change screen direction by having them walk up or down stairs or across the camera.
Take polaroids for continuity. They are not cheap, but can be written on and easily collected.
Photograph set and actors after the first print take, not before, as things may change.
Get the actors to show their shoes and hands prominently, so you remember where they wore the rings and such.
If a setup gets messed up, get a shot before the take so it can be easily reset for subsequent takes.
16 February 2007
Practical work

Apart from learning some of the basics of film making we also had some practical exercises. On Wednesday we were sent out into the wilds of Wellington to shoot - yes, with real cameras! - a piece illustrating screen direction and line of action.
If you’ve ever been confused by a movie and couldn’t place the actors in the location they were in, it may be that the line of action was crossed. If for example the actor is heading left to right through the frame on their way home, and in the next shot they are walking right to left through the frame, we may assume that they are returning rather than still walking home. That sort of thing. Anyway, a group of four of us headed out to make a little story in Cuba Street - about two friends and the porn shop.
After some discussion we set up to shoot some scenes, only to be moved on by an overzealous street sweeper who told us all about safety on the road. Admittedly, the tripod was off the kerb. Another learning experience was the confusion that resulted from lack of planning. A few storyboards and more thought put into the story line would have helped communication on site.
We were also hampered by the fact that we didn’t really know the kit very well, neither the little Panasonic nor Edward's fancy HD camera, which we used for filming. Explaining the buttons slowed us down on location. We should also have doled out task responsibilities in advance so that decision making would have been faster. But I guess those are all the kin of things we are supposed to mess up on the first shoot so that we make use of that learning experience later.
The other practical exercise revolves around telling a story in 6 still shots. This weekend project finds us handling actual analog film, something I haven’t done in years. Having lived with my trusty Nikon F2 only to discard her faithlessly as soon as digital became viable, I find myself remembering the pleasure of mechanical photography, the sound of the shutter, winding on, threading film, manual focussing. Ahh, the old times ;-)
Anyway, since the light meter was non-functional, I did backup shots with the digital camera in case the slides are under- or over-exposed, so I already had a chance to put a comic strip of the story together. Here are Anna and Stuart acting their hearts out, 1920’s silent movie-style.
12 February 2007
Shot descriptions

Clare Cunningham, a photography tutor and continuity expert, ran us through basic film language today, explaining a long list of abbreviations used to describe shots and other basic film terms:
Scene - a piece of the script set in one location
Shot - a new shot starts every time the frame changes (e.g. from wide shot to close up)
Take - a new take starts every time the camera is turned off and on again
Setup - Whenever the camera is moved to a new place (even within the same location) between takes, it’s a new setup.
Shot descriptions are done for various reasons, as aids to the director or editor, for example. They are always described from the point of view of the camera, and should be concise and one for each setup. They describe who is in the shot, have a summary of the action, any camera moves and shot size. Dialog may be indicated by quoting the first and last line ( “first ... last”). Here is a list of useful and common terms and abbreviations used in shot descriptions:
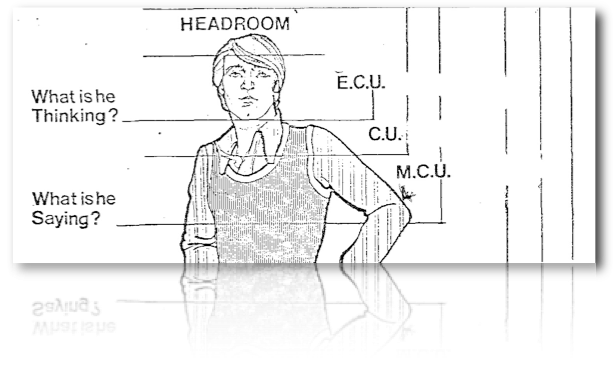
BCU/ECU - big closeup/extreme closeup
CU - Closeup
MCU - mid closeup
LMS - long mid shot
MS - mid shot
FS - full shot
LS - long shot
WS - wide shot
EWS - extreme wide shot
EST-S - establishing shot
Gp-S - group shot
Master-S - usually a wide shot
tight-s deep-s - deep shot, such as an over the shoulder shot of an object in focus in the background
OS - over the shoulder
H/A, L/A, W/A - high, low, wide angle
LL - long lens
HH - handheld Dutch tilt (L or R down) - horizon is tilted in the frame
Pan, Tilt, Dolly or Track (L or R, up or dwn, in or out) - camera moves: Pan and tilt denote camera moving on a pivot either L/R or up/dwn; dolly or track denote camera moving parallel or towards the action, usually on rails.
Z/I, Z/O - zoom in or out Crane up or dwn Follow or travelling shot
Ext/Int - exterior or interior
F/G, B/G - foreground or background
TOF, BOF, LOF, ROF - top, bottom, left or right of frame (also CR or CL for camera right or left)
X’s - actor or object crosses frame
FF - full frame
gain - more of the object moves into the frame
preframe - the frame of an empty shot, e.g. the door before the actor enters
C/A - cutaway or insert shot
POV - point of view
ES or TS - end slate or tail slate
Incomp/comp - incomplete or complete
FS - false start
NG/GD/AG - no good, good and again
MOS - no sound
OC or OS or OOV or OOF or OOS - off camera or off screen or out of view or out of frame or out of shot
Matte
Jump cut
Resolve - e.g. an emotional hold on the face, as used in soap operas
11 February 2007
NZ film history
 As a visitor to these shore my knowledge of the local film industry in pretty much non-existent. I have seen Once Were Warriors, The Piano and Whale Rider, of course, and who hasn’t heard of Peter Jackson’s oeuvre?
I won’t bore you with a rundown of NZ films (you can find those at the NZ Film Commission website), just a few Did You Know’s:
As a visitor to these shore my knowledge of the local film industry in pretty much non-existent. I have seen Once Were Warriors, The Piano and Whale Rider, of course, and who hasn’t heard of Peter Jackson’s oeuvre?
I won’t bore you with a rundown of NZ films (you can find those at the NZ Film Commission website), just a few Did You Know’s:★ NZ has the highest per-capita cinema going in the World.
★ Broken Barrier was the first internationally distributed NZ film
★ Pacific Films, one of the first independent commercial film studios, used to shoot rugby games on saturdays and have 10 minute summaries in the cinemas by the following Tuesday.
★ TV transmission started in the 1960’s, in Auckland only at first, and only between 6 and 9 pm. Colour came in the early ’70, as did a second TV channel.
★ There was no network, film reels were shipped round the local TV stations by planes.
★ The 1977 premier of Sleeping Dogs sees the first commercial feature film made in NZ with a NZ theme (what if Vietnam happened in NZ).
★ 1980 saw the introduction of tax-deductible investment for films, which led to a rash of feature being made. Since many of them were not specifically NZ-themed, it was decided to end this kind of financing and to only finance films that had a NZ story and setting, and were directed, produced and written by NZ talent.
10 February 2007
First week
 At the end of the first week |(admittedly lasting only three days) I am dizzy and hopeful and raring to go.
But first some facts. There are 19 people in our crew (Crew 14, that’s us). Mostly blokes, and 4 women. We are a mix of age groups from 18 to 43, from various parts of New Zealand, a couple of Yanks and other assorted foreigners.
At the end of the first week |(admittedly lasting only three days) I am dizzy and hopeful and raring to go.
But first some facts. There are 19 people in our crew (Crew 14, that’s us). Mostly blokes, and 4 women. We are a mix of age groups from 18 to 43, from various parts of New Zealand, a couple of Yanks and other assorted foreigners.Our day will be from 8.45 till 16.30 with a one hour break for lunch. First day was devoted to admin, handing out locker keys and pc passwords and filling forms. We learnt about unit and 1st AD duties, which involve keeping the kitchen clean and completing the attendance roster. We were also handed call sheets, a weekly page that shows all events, locations and other information for the coming week. That way everyone knows where they have to be when. And we were reminded of the importance of being punctual, since that is the first rule of all film work: be on time or this is your last job. Just like a real film set ;-)
On day 2 we were introduced to first concepts of digital media, line resolution and video formats. Factoid of the day: did you know that cats can distinguish 130 frames per second to the human ability of 24 frames per second? Not surprising that my cat stared uncomprehending at the screen, all she sees are series of still frames.
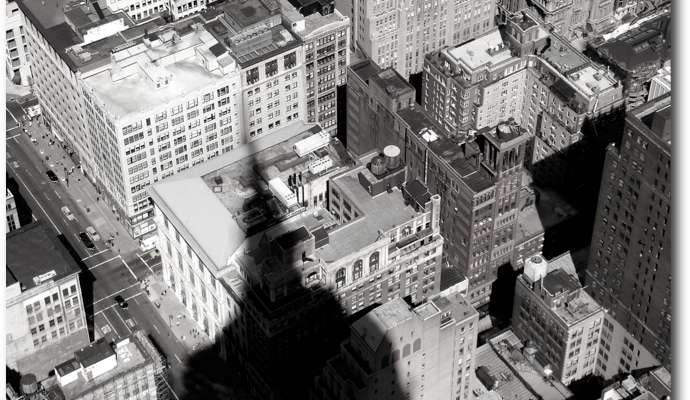
Highlight of the week for me was a trip to the film archive. First we got to watch old newsreel on the big screen and touch actual 2 inch video tape and then got to spend the rest of the afternoon with the DVD viewing library. Rows and rows of footage right there for the watching (see above photo)!
Lastly we were introduced to the cute little Panasonic camcorders we get to use for our projects, watched Some Like it Hot as an introduction to the Friday screenings, where we will all present our own chosen feature one day, and met some people from the NZ film industry. A good first week.
02 February 2007
About to Start
 Only one more week till film school starts. I am spending my time cleaning out the Mac to make space for all the new footage that will inevitably be coming my way. Otherwise I am trying to keep my head as clear as possible, see what happens.
Subscribe to:
Posts (Atom)